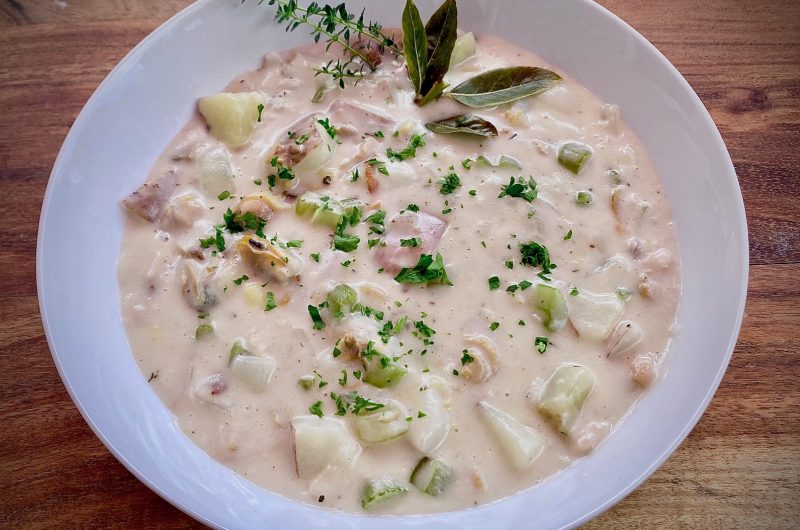
Rich, creamy and delicious are words that come to mind when describing New England clam chowder which is sometimes called Boston clam chowder. There are 3 main types of clam chowder served in northeastern US, there is Manhattan style which is tomato based, Rhode Island style which is clear and of course the New England creamy kind.

While I did not invent this soup, I have cooked a few thousand gallons of it in various restaurants and can tell you first hand how to mess it up and make a disaster out of it. Hopefully I can also share some tips about how to avoid some of the missteps and perhaps fix the ones already made.
When you make it at home you have the opportunity to use fresh clams. This is often not possible in a restaurant setting when you need to make 5, 10 or 20 gallons at a time while you are also attending to other tasks. Restaurants use canned chopped clams and canned clam juice and you can too for adequate chowder.
Clam type and how to pick them and take care of them.

Quahog clams are east coast hardshell clams. They are named by size and usually as follows from smallest to largest: littlenecks, countnecks, topnecks, cherrystones, quahogs and chowder clams. Quahogs, chowder clams and cherrystones are larger and best used for chowder after steaming and chopping them up. The smaller varieties are more expensive and better used for other preparations.
Surf clams are a larger clams and also work well for chowder. Razor clams and steamer clams can be used but are better suited for other dishes. If you are not on the east coast of the US you can usually find some comparable substitute.
Fresh clams should be closed, absent of strong odor and sound solid like rocks when tapped against each other, not sound hollow. Keep your clams cold and ideally covered with a wet towel. Do not keep them in standing water or closed plastic bags or containers – they are alive or should be. Use them as soon as possible.
Wet towels keep the air humid around live shellfish so they don’t dry out and die, keep the container drained as live shellfish will drown in standing water accumulating by waste draining from the other shellfish.
First rinse the clams and scrub if needed, don’t let them sit in water as you will lose the delicious brine from inside the clam. Discard any open, broken, dead and smelly clams.
Prepare your ingredients.
The soup base is clam juice, we take our cleaned and inspected clams put them in a soup pot with some water and steam them until they open. Keep a lid on to speed it up but check after 5-8 minutes and start removing any clams that have opened. It usually takes about 10 minutes. Reserve all the cooking liquid and strain well to remove any sand or shell pieces.
After the clams have cooled, remove them from the shells, if they have any sand on them, give them a rinse. Chop the clams and reserve. You can prepare your clams and clam juice a day before.
Wash and peel your vegetables then chop them up and measure out the proper amounts of everything.
Up to this point problems are minimal – if you had bad/dead/smelly clams and cooked them, discard and start over. Sandy or muddy clams can usually be washed and the juice strained through coffee filters. If you are missing ingredients you can pick them up.
Time to cook.
Saute your vegetables until they are transparent and slightly soft – not mushy. Cook your potatoes in lightly salted water until just tender. Bring your clam juice to a simmer and thicken with the slurry/cold roux then turn down the heat and let it cook for 20 minutes while stirring. Add the seasoning, vegetables, potatoes, cream and clams, give the pot a good stir and let it cook on low (while stirring occasionally) for 5-10 minutes.
Taste the soup and make adjustments: if it needs thinning add more clam juice, cream and/or water, adjust the seasoning if needed and if the vegetables still have some crunch you can cook it a little longer.
Things that go wrong – catastrophically!
If your clams were bad or overly muddy – get new ones, save the soup for later or perhaps another day and order takeout.
If your a soup starts to stick to the bottom of the pot and burn (because you forgot to stir!). Well, if there is no burnt taste and it doesn’t seem 2 inches thick stuck to the bottom of the pot you may be able to save it by pouring it into a clean pot and finishing it and don’t forget to turn the heat down and stir this time. If it is caked to the bottom and smells like smoked porkbutt or embers from your burned down house – well, there probably will not be clam chowder on the table. Discard the mess and spend 30 minutes scraping and scrubbing the pot to remind you to stir the pot next time, always a good lesson. This has happened to me a number of times over the years in the restaurant world, the worst was when I burned 3 consecutive batches. Each time you start over you are more stressed out and have less time to finish the task.
The smaller adjustments that can be fixed:
Soup is too thin – strain some of the soup out and thicken it some more with additional flour and water slurry. Make sure you cook it for a while to tone down the flour taste, then add the rest of the soup back to it.
Vegetables are undercooked – cook it longer until they are done but resist the temptation to turn up the heat and keep stirring. If your veggies are mushy you can cook some additional vegetables and add to the soup to fix it.
Soup is too salty – add some more cream, water and vegetables and adjust the other seasonings. Potatoes are a great way to soak up saltiness. You can use them 2 ways, either peel and ice them and let them cook in the soup to suck up some of the salt or put a few whole peeled potatoes in and discard them after they have cooked and soaked up some of the salt. You might not save every batch but there are ways to try.
New England clam chowder
Course: soupCuisine: AmericanDifficulty: Medium6
servings35
minutes50
minutes1
hour25
minutesIngredients
- Fresh clams for chopping and clam juice
12 whole 12 Cherrystone clams, live fresh in shell
1.5 cup 1.5 water
- Clam chowder
1.25 cup 1.25 water
1/2 cup 1/2 flour, all purpose
2 Tbs 2 butter
3/4 cup 3/4 onions, 3/4 inch dice
1/2 cup 1/2 leeks, 3/4 inch dice
3/4 cup 3/4 celery, 3/4 inch dice
2 cup 2 potatoes, peeled and diced 1″
2 whole 2 bayleaves
1/2 tsp 1/2 thyme
1/4 tsp 1/4 white pepper, ground
1/2 tsp 1/2 onion powder
1/2 cup 1/2 heavy cream
1 tsp 1 salt
- Optional, see note below
4 slices 4 bacon, chopped 1/2 inch
1/2 tsp 1/2 celery seed
1/2 Tbs 1/2 clam base
Directions
- Rinse and scrub clams and make sure they are alive and closed. In a soup pot with a lid, bring 1.5 cups of water to a boil, add the clams to it and cover with a lid. Steam the clams about 10 minutes, start checking for clams opening after about 5 minutes and remove from pot as they open. Keep steaming until all clams are open and removed to a separate bowl, let the clams cool enough to handle. Save the cooking juice.
- Remove clams from the shells (if they seem sandy, give them a quick rinse). Pour any liquid from the clams back in the pot and strain the juice well to remove sand or shell fragments. Chop the clams into strips and reserve.
You should have about 3 cups of clam juice and 3/4 cup chopped clams. - Melt the butter in a 2 qt pot and cook the onions, leeks and celery until tender and transparent. In another 2 qt pot boil the diced potatoes in 2 cups of water with 1 tsp salt until just tender – about 15 minutes.
- Bring the clam juice to a simmer in a soup pot, while it is heating whisk together the cold water and flour into a slurry (cold roux). Once the clam juice comes to a simmer, lower the heat to low. Pour the flour and water slurry through a strainer into the hot clam juice while whisking with a wire whisk. Once you have added the flour slurry to the soup you must keep the heat low and whisk or stir the soup regularly so it won’t stick to the bottom and burn.
- Cook the thickened soup for 10-15 minutes to get rid of the raw flour taste. Add all the seasonings, the cooked vegetables, cooked potatoes and chopped clams and give it a good stir.
Cook the soup about 10 minute and remember to stir.
Add the cream and cook 2-5 minutes. - Taste the soup to see if you need to add more salt or alternatively add more cream or water to reduce saltiness and thin the soup.
Your soup is done and ready to serve, ladle into bowls and sprinkle with fresh chopped parsley. Serve with some fresh, crusty bread and enjoy.
Equipment
- Cutting board, paring knife, peeler, chefs knife , fine strainer.
- 2 qt pot, 2qt pot, 6-8qt soup pot with lid, medium bowl, medium whisk, large whisk, stirring spoon
- measuring cups, measuring spoons, bowls to hold your pre measured ingredients
Notes
- Bacon is often called for in clam chowder and is delicious. If you would like to use bacon, cook it crisp before you cook your onions, leeks and celery. Remove the crispy bacon from the pot and cook the vegetables in the bacon fat instead of the butter. I never used bacon to make clam chowder in the restaurants because many customers wanted a soup without meat and we always had clam chowder on fridays – if we had put bacon in it many customers would not have ordered it.
- Celery seed gives the soup richer celery flavor but is optional.
- Clam base gives the soup a richer flavor, I often use base as a substitute for salt to heighten flavor. Clam base however can be hard to find.